How to Change Admin User Name Windows 10
When setting up your PC, Windows requires you to enter a name for your administrator account. You can enter your pet's name, your nickname, or even a fictional name; you can set up the account without any issues. However, what if you had a change of mind and wanted to change the local administrator name in Windows 10?
Well, the good news is that Windows 10 includes multiple ways to change local administrator names. What's not so good is that name changing is not the most straightforward process.
It can be done but requires some navigation through the settings. If you are not sure how to do that, we are here to help. This article explores the five ways to change local administrator names in Windows 10.
Also Read:
- How to Add User to Local Administrator Group in Windows 10
- How to Change Account Type on Windows 10 with/without Password
How to Change Local Administrator Name in Windows 10
Method 1. Change Local Administrator Name in Windows 10 from Computer Management
The first method involves changing the local administrator name in Windows 10 from Computer Management. This is the fastest option available to make changes to your administrator name.
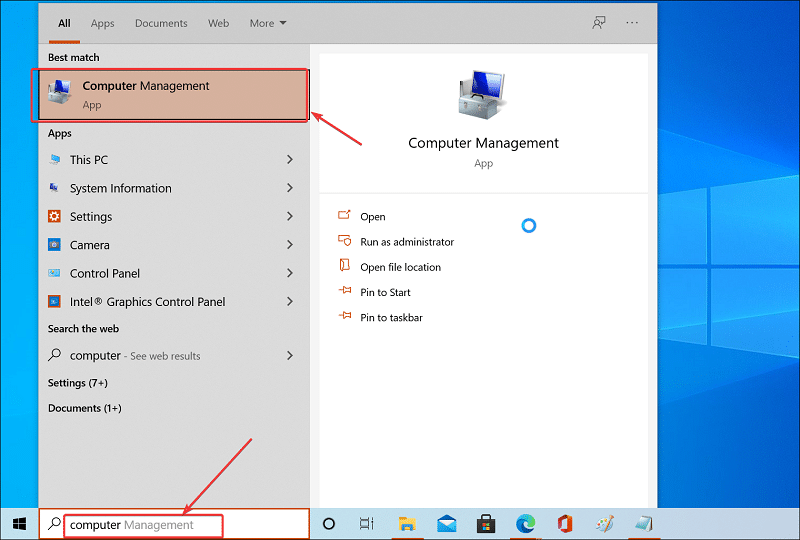
Step 1. Press the Windows key to bring up the search bar. Type Computer Management and then click on the Computer Management option from the search result.
Read More: How to Open Computer Management in Windows 10
Steps 2. In the Computer Management window, expand the Local Users and Groups section. Note that this option is not available on Windows 10 Home edition. Move to the next method if your PC is running on Windows 10 Home.
Step 3. Select the Users option. Select and right-click on the administrator user that you want to rename.
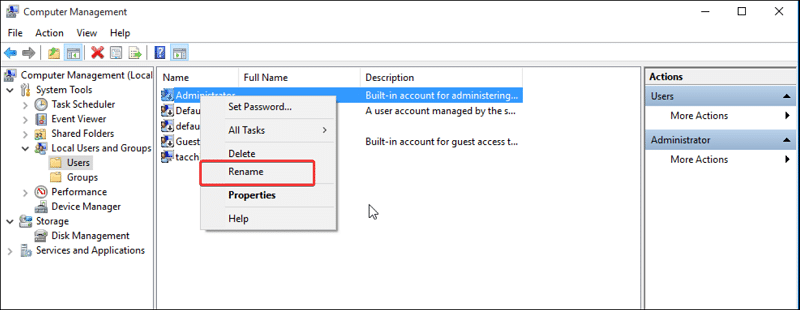
Step 5. Choose Rename from the context menu. Enter your preferred name for the local administrator account. Hit the Enter key to save the changes.
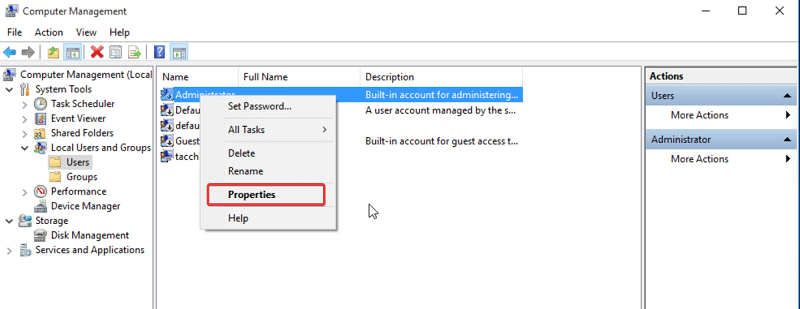
Step 6. Right-click on the renamed account and choose Properties.
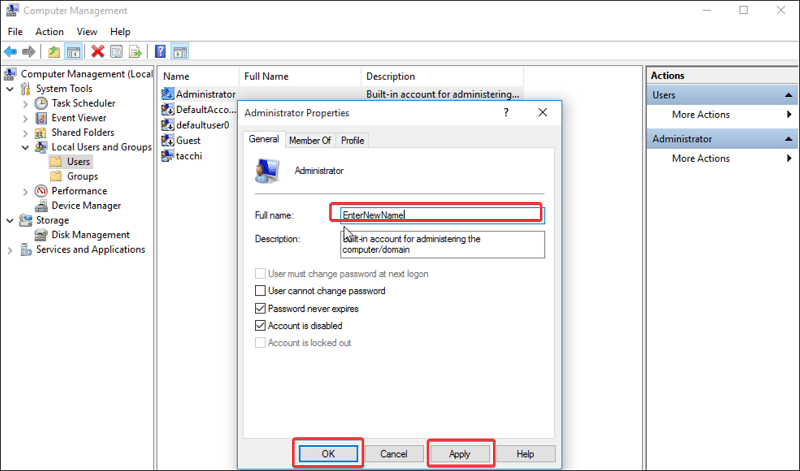
Step 7: Enter a full name and click Apply and OK to save the changes.
Method 2. Change Local Administrator Name in Windows 10 from Control Panel
Some Computer Management features such as access to local user groups and administrators are limited to non-Windows 10 home users. However, you can use the classic Control Panel to rename administrator accounts in Windows 10. Here's how to do it.
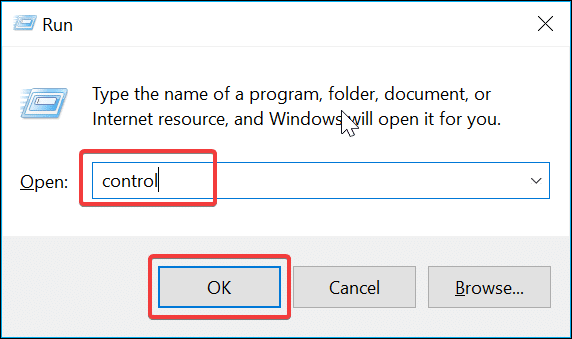
Step 1. Press the Windows key + R to open the Run dialog box.
Step 2. Type control in the Run box and click OK to open the Control Panel.
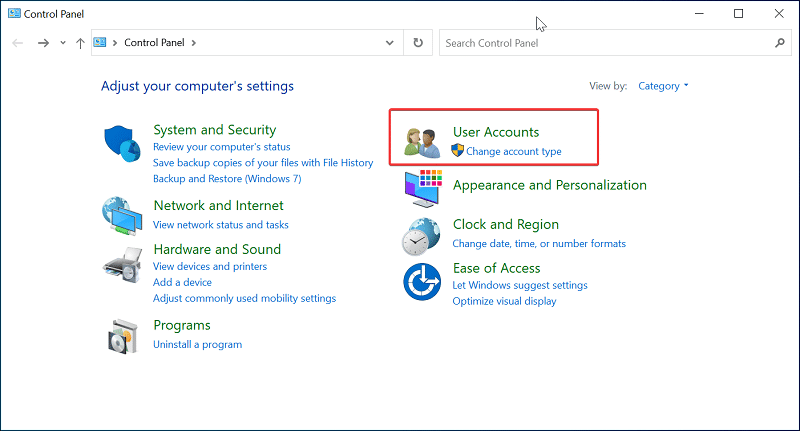
Step 3. Click on User Accounts in the Control Panel.
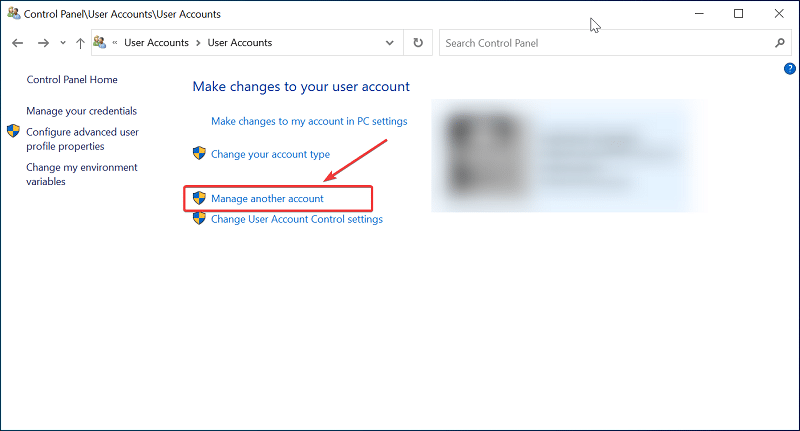
Step 4. In the next window, click on User Accounts again.
Step 5. In the Make changes to your user account window, click on Manage another account. Click OK if prompted by the User Account Control window.
Step 6. Select the administrator account that you want to rename from the list.
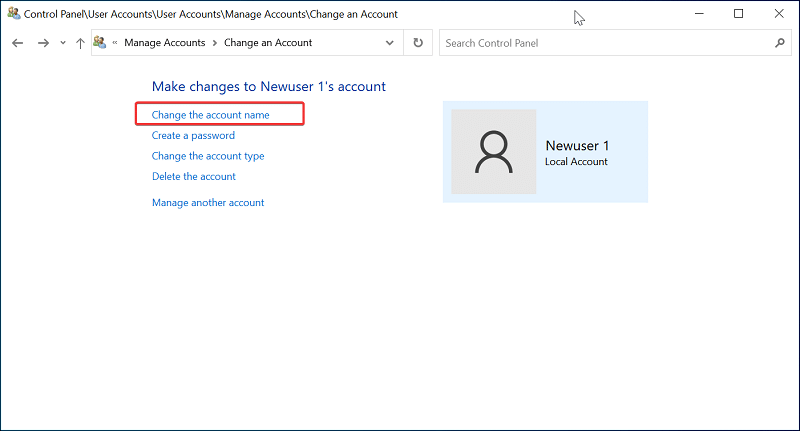
Step 7. Click on the Change the account name option.
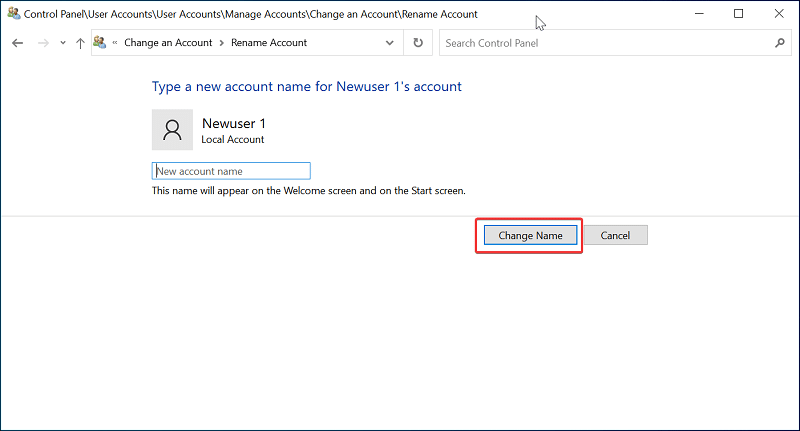
Step 7. Enter a new name for your administrator account and click Change Name. This should change the admin name in Windows 10.
Method 3. Change Administrator Name in Windows 10 via Command Prompt
If you fancy typing a few commands to get your work done than navigate through Windows settings, you can also change the administrator name using Command Prompt in Windows 10.
Step 1. Press the Windows key and type cmd in the search bar.
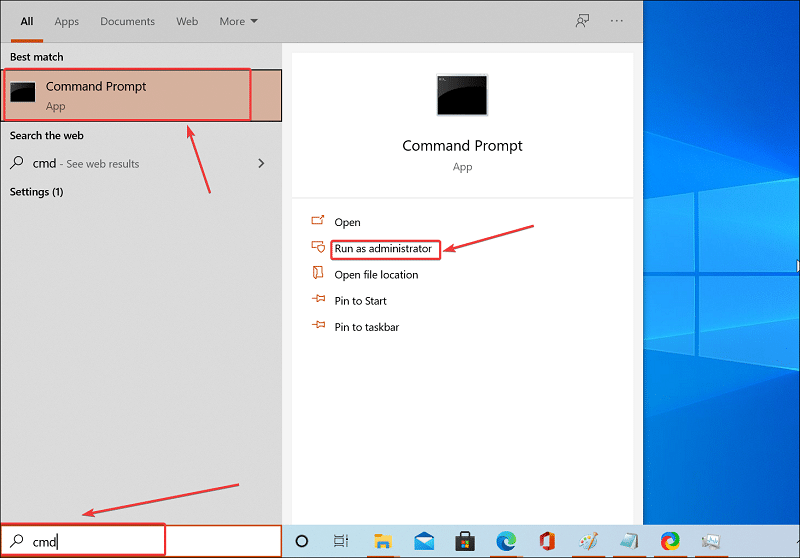
Step 2. Right-click on the Command Prompt option from the search result and choose Run as Administrator. Click Yes if prompted by UAC. It is important to open an elevated command prompt to execute this command.
Read More: How to Run Command Prompt as Administrator in Windows 10
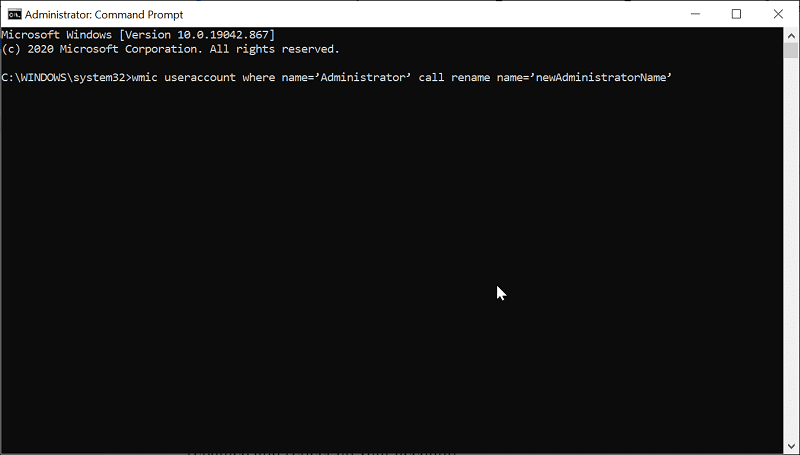
Step 3. In the Command Prompt window, type the following command and hit enter. In the below command, replace newAdministratorName with the name you want to rename your administrator account as.
wmic useraccount where name='Administrator' call rename name='newAdministratorName'
Step 4. Once the command is executed, your administration name will be renamed and reflect on your account.
To ensure the change in admin name in Windows 10, open Computer Management and check the Local Users and Groups section.
Method 4. Change Administrator Name in Windows 10 via Advanced Control Panel
User Accounts in Windows 10 allows you to add new users or remove existing ones. It can also be used to change user account properties, such as changing the administrator name on Windows 10.
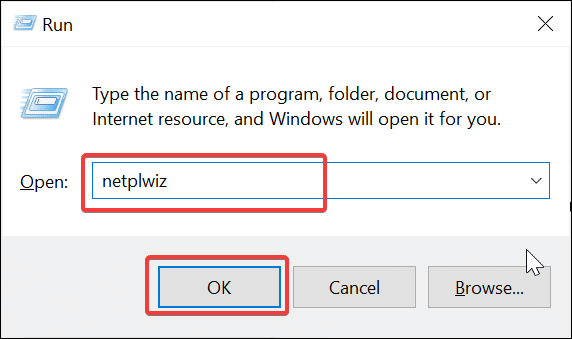
Step 1. Press the Windows key + R to open the Run dialog box.
Step 2. Type netplwiz and click OK to open the User Account.
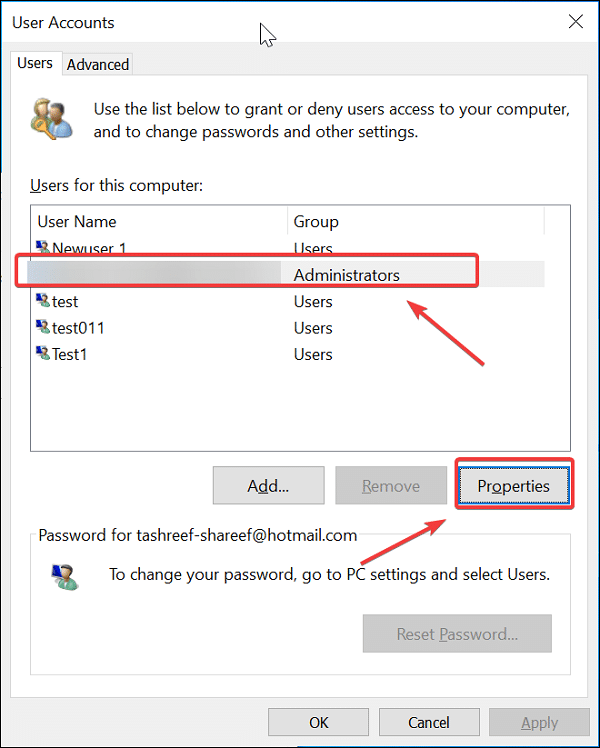
Step 3. Select your administrator account from the list under User for this Computer.
Step 4. Click the Properties button.
Step 5. In the General tab, rename the existing username with a new name.
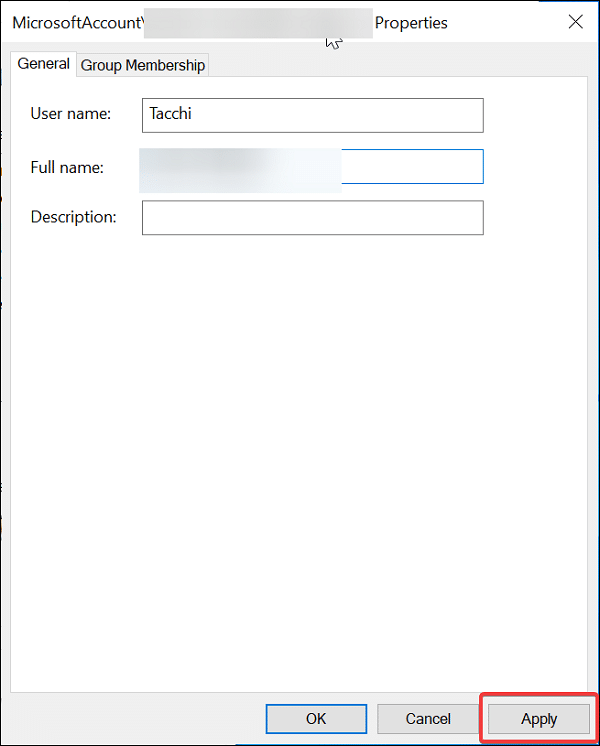
Step 6. Click Apply and OK to save the changes. Click Apply and OK for all the open User Account windows as well.
Method 5. Change Administrator Name in Windows 10 via Local Group Policy Editor
Local Group Policy Editor is used to configure Group Policy settings with GPOs (Group Policy Objects). To be able to change the administrator name in Windows 10 using Group Policy Editor, you must have a GPO created and linked to Active Directory Container.
Assuming that you meet the prerequisites mentioned above, follow these steps to change the admin name using GPE.
Note: Windows 10 Home edition comes with Group Policy Editor disabled by default. If you are using Windows 10, enable Group Policy Editor and then proceed with the steps below.
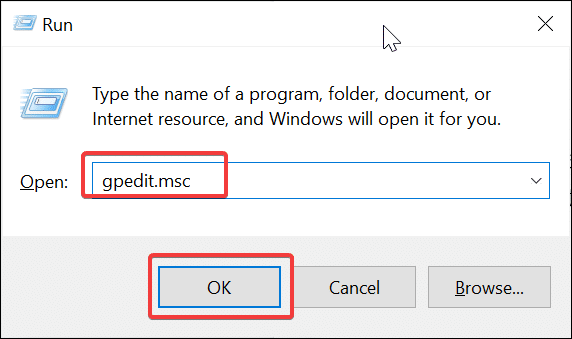
Step 1. Press the Windows key + R to open Run.
Step 2. Type gpedit.msc and click OK to open the Local Group Policy Editor.
Step 3. In the Group Policy Editor, expand Computer Configuration > Windows Settings > Security Setting.
Step 4. Next, expand Local Policies and select Security Options. You will see a couple of policies on the right pane.
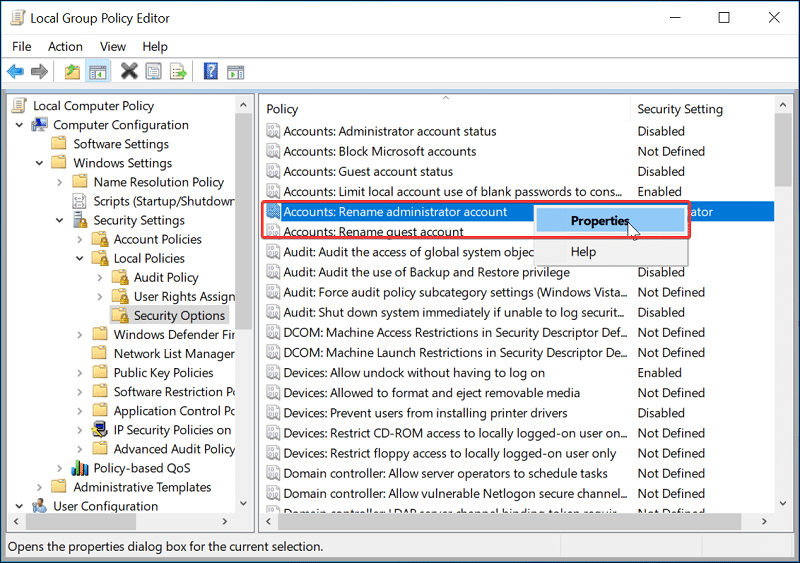
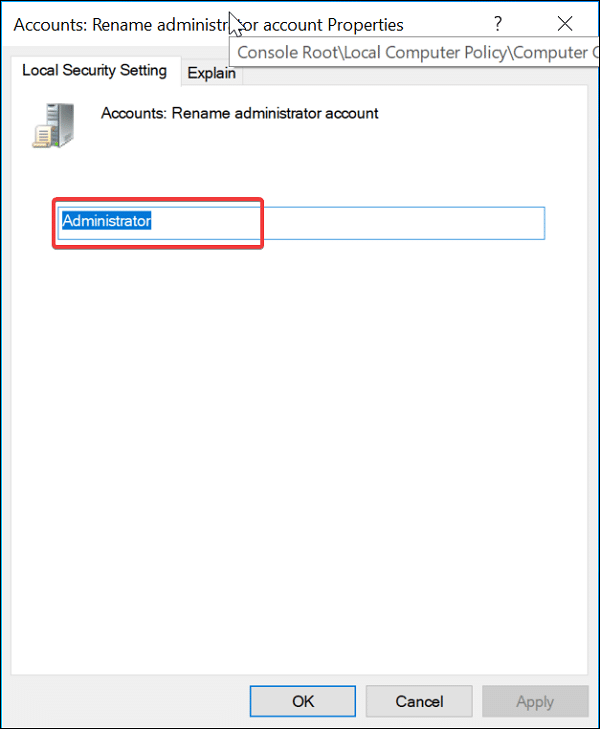
Step 5. In the right pane, right-click on Accounts: rename administrator account policy.
Step 6. Choose Properties.
Step 7. In the new Properties window, enter a new name for the administrator account. Click Apply and OK to save the changes.
You can check in the Security Settings column if the newly assigned name has been applied to the administrator account.
Conclusion
One may have many reasons to change their administrator account. Whether you are trying to hand over the PC to someone else or even looking to customize your system with your personal touch, these steps will help.
The easiest way to change the local administrator name in Windows 10 is to use Computer Management and Local Users and Groups options. However, Windows 10 Home edition users don't have access to Local User and Groups options.
Fortunately, there are a couple of more methods to rename your administrator account in Windows 10. Whether you want to use the traditional classic Control Panel or achieve it with a single line of command through Command Prompt is a personal preference.
If you have followed these steps, you should have successfully changed the local administrator name in Windows 10. Do let us know which method worked for you in the comments.
How to Change Admin User Name Windows 10
Source: https://www.wincope.com/how-to-change-local-administrator-name-in-windows-10.html
0 Response to "How to Change Admin User Name Windows 10"
Post a Comment